Configuring DynamoDB and basic operations for ruby apps

Intro
Hi, in this blog post I’m discussing some of the basic API functions which come in handy to use dynamoDB. These are all well documented on Amazon documentation as well as the library which might use to integrate with AWS, So why this post ? The reason for that is there’s a lot of options, and to help you with what you need in the beginning here I list my opinions and my suggested way of doing it. Remember working on a DynamoDB is almost a no-brainer when you got your basics clear. If you are a beginner and you know nothing about no SQL databases, I have a basic introduction post where I talk about most of the if’s and but’s you need to know and a simple guide on the concepts DynamoDB here. Here my choice of language is Ruby, but it’s an easy digest for any other as well.
Setting up a local development environment
-
Download a locally executable DynamoDB application which you can use for development from aws
-
Navigate to the folder and run
java -Djava.library.path=./DynamoDBLocal_lib -jar DynamoDBLocal.jar -help, use any option, if you want to. -
I use the inMemory flag, to not persist data locally and let it run just on memory, and the sharedDB for storing all-region work at one place, good for saving on some system requirements. The flags are well described here
java -Djava.library.path=./DynamoDBLocal_lib -jar DynamoDBLocal.jar -sharedDb -inMemory -
And Hurray, your local DB server is running.
-
Quickly download awscli if you don’t have one. awscli provides you with the superpowers to communicate with AWS from command line :p.
- Linux Users:
sudo apt install awscli - Mac Users:
brew install awscli(Add Homebrew if you don’t have it 🙂 - Alternatively, take some time and read about cli here
- Linux Users:
-
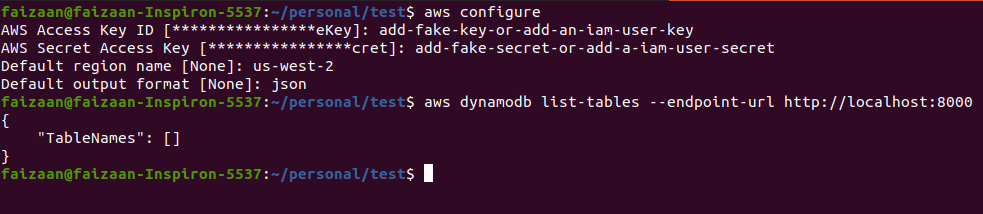
Now that we have aws-cli and dynamoDB client running on the local machine. We can go ahead and run a command. Let’s see what all tables exists, we expect the output should be empty. But Before that we need to configure AWS credentials, don’t worry we only need fake values for the local system to work.
-
Run
aws configure -
Add any fake string as shown in the image below, for access key id and access key secret.
-
Set an AWS region, some examples include, us-west-2, ap-south-1.
-
Set CLI response type to JSON, or whatever your choice is if you read the CLI documentation.
-
We have a local instance set, credentials added for aws-cli, and now we should be able to make a call to our local dynamoDB.
aws dynamodb list-tables --endpoint-url http://localhost:8000
That’s all for local setup and using API endpoints through CLI. You can update your credentials to real one, and not pass an endpoint URL in a general case, to use the AWS dynamoDB which is on the cloud. If due to some config issue it doesn’t fetch data from the table you want, you might need to pass an end-point URL, and for that you can follow the standard scheme for AWS service URLs.
Aws service URL structure is: protocol://service-code.region-code.amazonaws.com.
So for a dynamoDB table in us-west-2, we will have the endpoint as https://dynamodb.us-west-2.amazonaws.com.
Setting up gems and client configs on any ruby application
Here, I will show you how to configure your ruby app to use dynamoDB. Rails users can add specific classes and codes as per their choices in initializers and concerns etc.
- We will use the gem
aws-sdk-dynamodb, so create a Gemfile, and add the latest one from RubyGems, and bundle. At the time of writing this I’m usinggem 'aws-sdk-dynamodb', '~> 1.0.0.rc7'
|
|
- Now we will create an AWS dynamoDB client object, such that it can be used to perform the actions.
- In the most basic syntax this is as simple as calling new on Aws::DynamoDB::Client class with a region option passed. And if you are in an environment with a preset AWS config, it is all you need.
|
|
- Ok, we can define the aws global configs for this app if required as below, assuming credentials struct is from the environment. And that should be good to go for using client.
|
|
- We can also pass, the config key-value pairs to the Aws::DynamoDB::Client class while initializing it, and that will also be good enough.
- Since through this post we will be using local dynamoDB, we only need to pass a region and our local endpoint URL.
|
|
By now, we have added the required gem, and have a client object. This looks like the right time to create a table. So let’s go ahead and do that.
Working with tables and records
Creating a table
I hope you have been through my last post on dynamoDB and you have already created a table using the AWS web console. Here we will be doing the same but from the SDK. In general, you can add these code in a rails task, or a ruby script and run it when you require to setup. Also, many tend to use the web console to create the tables and use them since it’s a one-time affair, but it is important for them who are adding it to an application and want to use for different environments etc.
We will use create_table API endpoint. Here we need to understand a few basic options which we will be sending in params.
-
table_name: Table name 🙂
-
key_schema: Key schema is an array of objects containing information about fields which you want as your primary key.
- attribute_name: It’s the field name for which you are setting a primary key attribute
- key_type: It defines the role of the key attribute set, Hash defines a partition key and range defines a sort key.
-
attribute_definitions: Here we need to define the data type of the attributes we are setting in key schemas for the table and any indexes which other than our primary index too. The data types for the attributes are:
- S - the attribute is of type String
- N - the attribute is of type Number
- B - the attribute is of type Binary
-
provisioned_throughput: provisioned throughput is about what kind of capacity you wish to have and will pay for. We don’t need to jump into understanding the exact need we have, AWS is tricky here and it’s a whole bunch of a subject. If you need to understand how the billing works for the provisioned system you can start with this. In very naive terms we can understand this as below:
- RCU: Read capacity unit represents a read request for an item of 4KB size in 1 second.
- WCU: Write capacity unit represents a write request for an item of 1KB size in 1 second.
|
|
After running the above code, you should be able to see your table listed using the call we made earlier.
aws dynamodb list-tables --endpoint-url http://localhost:8000

Updating a table
We can not update a table’s primary keys, but we can add global indexes with table update calls, update rcu, wcu, and perform other updates like enabling time_to_live. Yes, I am taking this opportunity to tell you something about time to live. Dynamo provides us with an option to set time to live for all the records we create in epoch(a kind of time format). Time to live is a great tool for apps that are storing data on dynamo temporarily. You can set it ttl (time_to_live) to given date time and the record will be deleted by dynamo when the time comes. For updates aws provides update_table, which can be used for updating rcu, wcu and adding GSI (global secondary index). Here I will use anothe api method update_time_to_live.
Here, I am enabling time to live specification and also setting the attribute name, which will allow us to add a epoch value for the records time to live.
|
|
Writing records on the table
Writing records on the table is yet another simple task, you can use the below code and pass your record to add. What we are doing below is, we are calling put_item method with item and table name. Item consists of an object which can be multiple levels nested or flat, but must have the primary key attributes defined. As you already know, we can try new attributes on the fly and we only need to stick with the primary key attributes, others are all dynamically created.
put_item will add an item or replace the item if there’s a primary key conflict.
|
|
Fetching records from the table
We can fetch a record by calling get_item, and we need to pass the primary key attributes (Both partition and sort key if both are created, or just partition key if there’s only one primary key attribute).
Let’s use the get_item method and fetch the data we created just now.
|
|
Updating a record on the table
We can use put_item and replace the entire record, or we can also just update a non-primary key attribute.
Here we need to use expressions to make the update call using update_item. DynamoDB provides us with some expressions like an SQL syntax we use, one of which is used here and is set field = :the_variable_which_we_will_use_in_expression_attr_values. In update_expression we are passing a string that resembles a query to let dynamo identify a field with a specific name, which we will use in the expression_attribute_values to set a value. In return_values option we are setting UPDATED_NEW to get back the updated data.
|
|
Deleting a Table
Just to finish-up. Delete is as simple as expected.
|
|
Some other APIs to look at
In the last section we saw some basic scaffolding for executing simple calls to dynamoDB. It can be of good use, and other than that we also have few other important APIs to look at. I will just describe them, and you can have a brief understanding of them, such that you know what to use, when you need it.
- Batch APIs
- BatchGetItem: It can be used to fetch items from different tables using Partition Key and Sort Key. In a single BatchGetItem call, we can fetch up to 16MB data or 100 items.
- BatchWriteItem: It can be used to delete or put items on one or more tables in DynamoDB in one call. We can write up to 16 MB data, which can be 25 put and delete requests.
- Query and Pagination APIs
- Query: Query operation will return all items that are matched with the partition key of the table. Sort Key is further useful to filter and sort items but it is optional.
- Scan: Scan operation doesn’t require Partition Key or Sort Key to fetch results from the table. As the name suggests, it scans an entire table to filter results based on attribute values passed as filters.
- Pagination: DynamoDB Query/Scan results return a maximum of 1MB response size so if our request matches an item of size more than 1MB, it gets automatically divided into pages. In such cases DynamoDB returns a special response parameter “LastEvaluatedKey” and this can be used to fetch next page results. Please note we need to pass the value of “LastEvaluatedKey” as “ExclusiveStartKey” in the next request to DynamoDB.
Secondary Indexes
DynamoDB is very bad with fetching data when you are not using a key to get the data, and instead doing a scan operation. It was not meant to do that ever, if you need search capabilities elastic search is your goto option. We can query on primary indexes and can get data, but when we know that we will be needing some other attributes pairs too for some data fetching we can go ahead, and add them as indexes. Dynamo provides us with two types of secondary indexes.
- Global secondary index – An index with a partition key and sort key that can be different from those on the table. They are stored detached from the main table with their own partition.
- Local secondary index – An index that has the same partition key as the table, but a different sort key. They are stored with the table, in the same partition as the data it is referencing to.
End words
You can start working now, you have enough knowledge about the tools and and it’s always the journey where you learn, I hope I was able to stick to the very basics and help you out in understanding them. Adios.